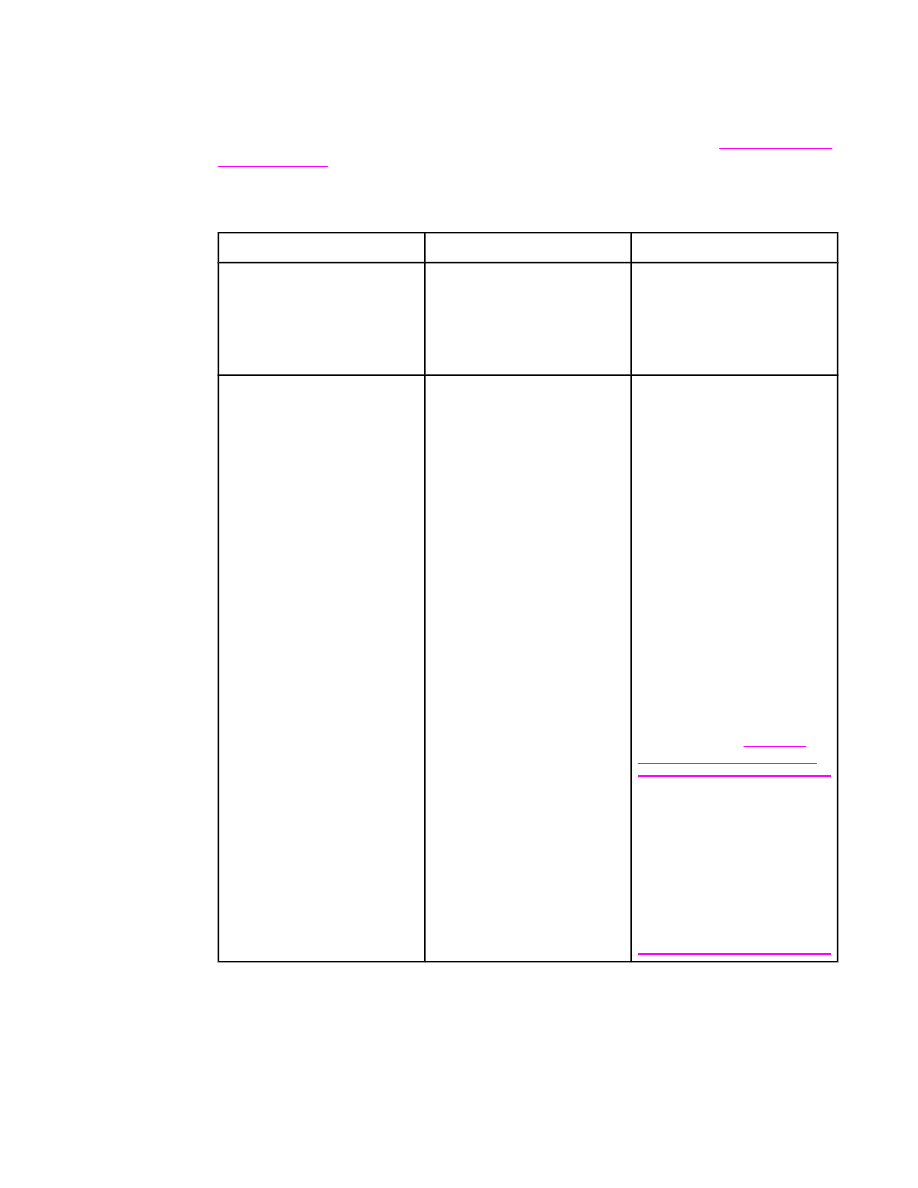
Print quality submenu
You can gain access to some of the items in this menu in either a software program, or in
the printer driver (if the correct printer driver is installed). Printer driver settings and software
program settings override control-panel settings. For more information, see
Using features in
the printer driver
.
To gain access to this menu, touch CONFIGURE DEVICE, and then touch PRINT QUALITY.
Item
Values
Explanation
SET REGISTRATION
PRINT TEST PAGE
SOURCE
ADJUST TRAY <X>
Shift the margin alignment to
center the image on the page
from top to bottom, and left to
right. You can also align the
image on the front, with the
image printed on the back.
FUSER MODES
List of media types
Configure the fuser mode
associated with each media
type. The fuser mode can be
changed only in this menu
option at the control panel.
NORMAL: Normal
temperature; prints at full speed.
HIGH1: Raises the
temperature; prints at 3/4 speed.
HIGH2: Raises the
temperature; prints at 1/2 speed.
LOW 1: Low temperature;
prints at 3/4 speed; used for
lightweight media.
LOW 2: Low temperature;
prints at full speed; used for
transparencies.
For a complete list of supported
media types, see
Supported
types and sizes of print media
.
CAUTION
If you change the fuser mode
to HIGH1 or HIGH2, be sure to
change it back to the default
when you are done printing.
Setting a paper type to HIGH1
or HIGH2 might shorten the life
of some consumables, such as
the fuser, and might cause
other failures or jams.
48
Chapter 2 Using the control panel
ENWW
Item
Values
Explanation
OPTIMIZE
HIGH TRANSFER
LINE DETAIL
RESTORE OPTIMIZE
This item optimizes a number
of MFP parameters for all jobs
rather than by media type. The
default setting for each value is
OFF.
Turn HIGH TRANSFER on if
parts of the printed image
appear to have extra toner.
Turn LINE DETAIL on if lines
and text are blurred.
RESTORE OPTIMIZE resets
all of the optimize parameters
to the default settings.
RESOLUTION
300
600
FASTRES 1200*
PRORES 1200
Select the resolution from the
following values:
300: Produces draft print
quality at maximum MFP
speed. 300 dpi (dots per inch)
is recommended for some
bitmapped fonts and graphics,
and for compatibility with the
HP LaserJet III family of printers.
600: Produces high print quality
at maximum product speed.
FASTRES 1200: Produces
optimum print quality
(comparable to 1200 dpi) at
maximum product speed.
PRORES 1200: Effectively
prints at 1200 dots per inch
(dpi) . This setting improves the
quality of the print output, but it
might result in longer printing
times.
Note
It is recommended that you
change the resolution in the
printer driver or in the software
program. (Printer-driver
settings and software-program
settings override control-panel
settings.)
ENWW
Configure device menu
49
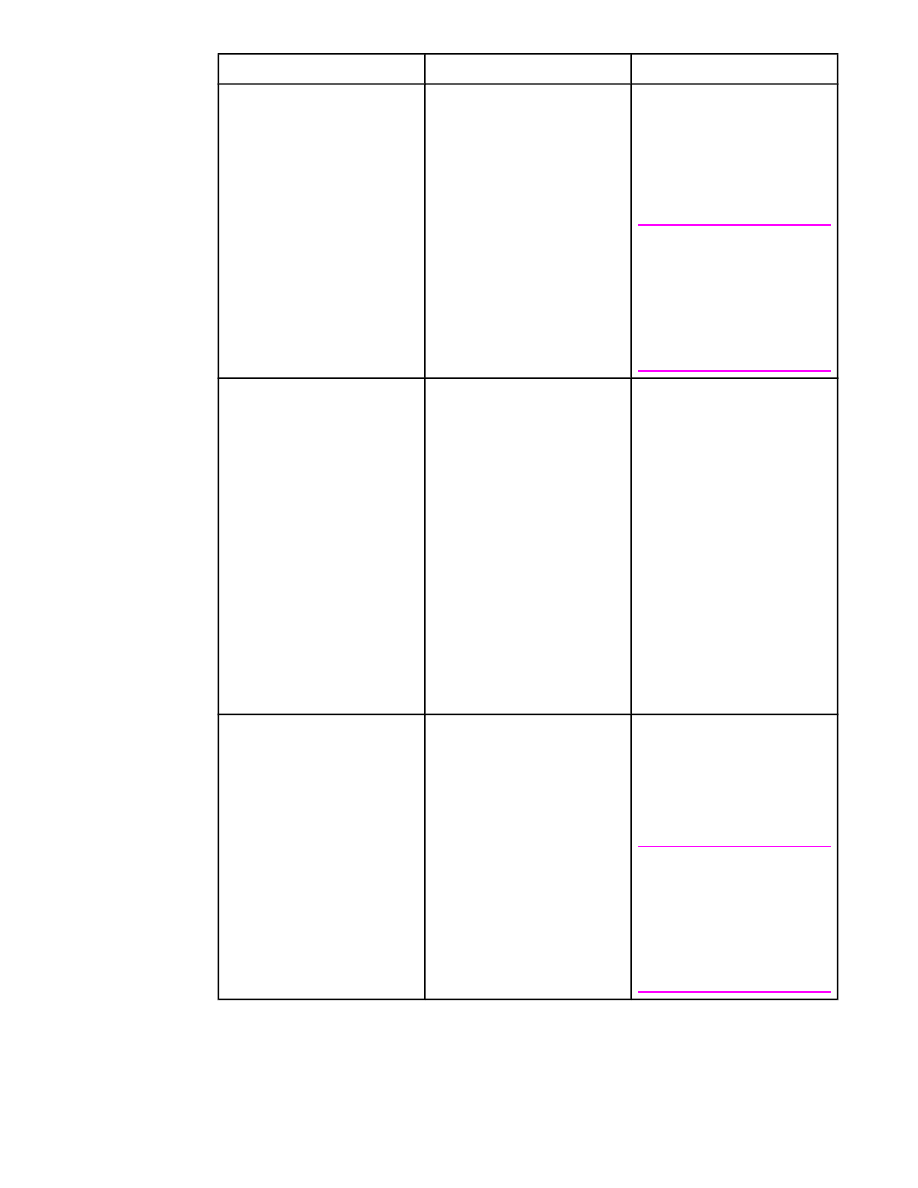
Item
Values
Explanation
RET
OFF
LIGHT
MEDIUM*
DARK
Use the Resolution
Enhancement technology (REt)
setting to produce print output
with smooth angles, curves,
and edges.
All print resolutions, including
FastRes 1200, benefit from REt.
Note
It is recommended that you
change the REt setting in the
printer driver or in the software
program. (Printer driver
settings and software program
settings override control-panel
settings.)
ECONOMODE
ON
OFF*
When EconoMode is set to ON,
the MFP prints with a reduced
amount of toner per page;
however, the print quality of the
page is drastically reduced.
HP does not recommend full-
time use of EconoMode. If
EconoMode is used full-time
when the average toner
coverage is significantly less
than 5%, it is possible that the
toner supply will outlast the
mechanical parts in the print
cartridge. If print quality begins
to degrade under these
circumstances, you will need to
install a new print cartridge,
even if a toner supply remains
in the cartridge.
TONER DENSITY
1 to 5
Lighten or darken the print on
the page by changing the toner
density setting. The settings
range from 1 (light) to 5 (dark),
but the default setting of 3
usually produces the best
results.
Note
It is recommended that you
change the toner density in the
printer driver or in the software
program. (Printer-driver
settings and software-program
settings override control-panel
settings.)
50
Chapter 2 Using the control panel
ENWW
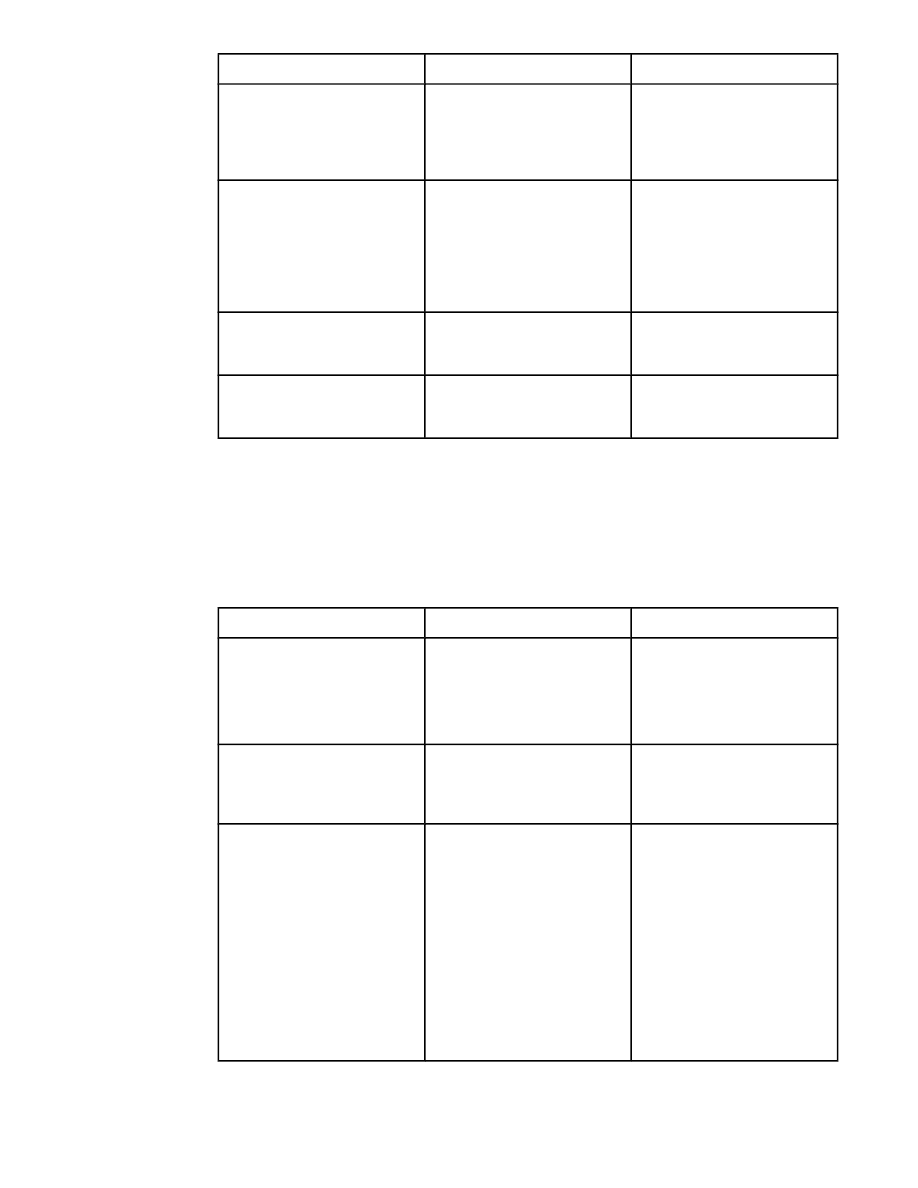
Item
Values
Explanation
AUTO CLEANING
ON*
OFF
When auto-cleaning is on, the
MFP prints a cleaning page
when the page count reaches
the value set in CLEANING
INTERVAL.
CLEANING INTERVAL
1000
2000
5000
10000
20000
Select the frequency that you
want the MFP to automatically
print a cleaning page.
AUTO CLEANING SIZE
LETTER
A4
Use this item to specify the
paper size that the MFP uses
to print the cleaning page.
PROCESS CLEANING PAGE
No value to select
Use this item to clean the fuser.
The cleaning process might
take up to 2.5 minutes.